Looking for a specific action? Jump straight to its page: Actions overview · Email · Mailchimp · MailerLite · Webhook · Redirect · Search
Video
What you can build
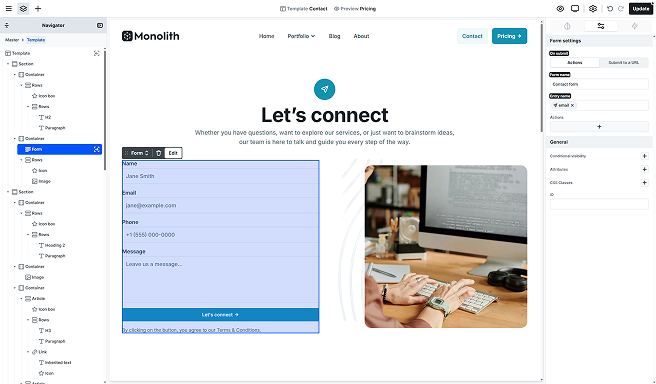
A form lets your visitors send you information, and lets your site do something useful with it. With Mosaic forms you can build things like:
- A contact form that emails you each message.
- A feedback or survey form.
- A form that collects file uploads, such as a job application with a CV.
- A search form that sends visitors to your site’s results page.
A form is built entirely from Mosaic elements, so you design and style it just like the rest of your site. When you add a Form, Mosaic starts you off with a ready-to-use contact form that you can rename, extend, and restyle.
The parts of a form
A form is made up of a Form wrapper containing two regions that are always present. You build inside both, but neither can be deleted or reordered:
- Form: the form itself, holding your fields, their labels, and the submit button. This is what the visitor fills in.
- Success screen: a confirmation area you build yourself, hidden until a submission succeeds. See Success screen.
You will find both nested inside the Form wrapper in the Navigator. Select any part to work on it.
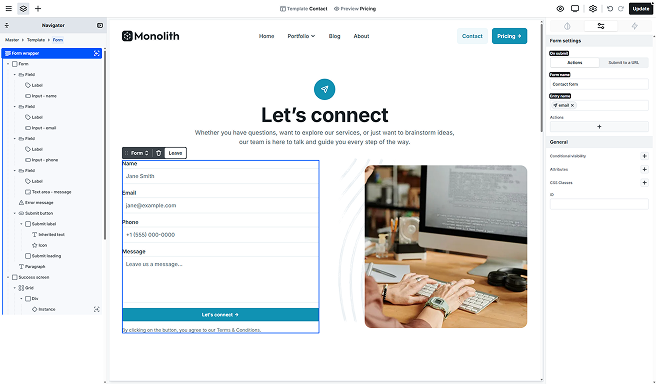
The Success screen appears only after a submission that Mosaic handles itself succeeds, that is, when On submit is set to Actions (described below) and no redirect sends the visitor to another page first. Until then, visitors see the form.
Adding a form
Add a Form the same way you add any other element in the editor. Mosaic inserts a ready-to-use contact form, so you have a working form straight away. From there you can:
- Add, remove, and rearrange fields to collect exactly what you need.
- Choose what happens on submit, such as who gets notified.
- Style every part to match your design with the Style tab.
The sections below explain each of these, and the list at the end of the page links to the detailed documentation for every element and setting.
Form settings
Select the Form wrapper to open its settings, where you decide what the form does when it is submitted and how its submissions are labeled.
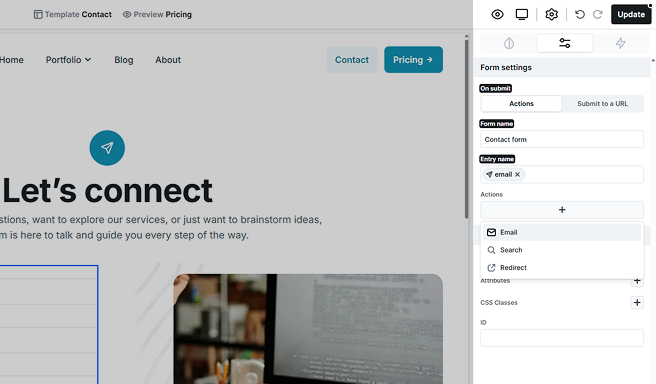
- On submit: how the submission is handled, either Actions or Submit to a URL. This is the most important choice, and it is covered in the next section.
- Form name: a name for the form so you can tell it apart from your other forms. It labels the form in the Form submissions screen, and is also available as a dynamic variable, handy for something like an email subject. Leave it empty and submissions read “Unlabeled form”.
- Entry name: which field labels each individual submission in the list, usually the visitor’s email address or name.
Form name and Entry name shape how your saved submissions read in the WordPress admin. See Form submissions for the admin side.
How a form is submitted
The On submit setting gives every form one of two jobs, and a form uses one or the other:
- Actions: Mosaic receives the submission, validates it, runs its spam protection, and then carries out the actions you set up, such as sending an email, redirecting the visitor, or running a search. This is the default and the path most forms use. The actions (Webhook, Mailchimp, MailerLite, etc.) are covered on the Actions page.
- Submit to a URL: the form hands the submission straight to a web address you choose, outside Mosaic. Use this only for simple handoffs to an endpoint you already trust. It is described below.
While you are editing, switching between the two is safe: your setup for each is kept, so you can flip to Submit to a URL to compare and flip back to Actions without losing your work. Only the option you have selected is saved and used on your live form, so if you reload the editor the settings for the other option are lost.
Validation
Before a form is sent, the browser checks it against the rules on each field, such as a required field left empty or an email address in the wrong format, and stops the submission until they are fixed. When On submit is set to Actions, Mosaic then checks everything again on the server, which is the authoritative check a visitor cannot skip.
By default, validation problems appear in the browser’s own bubble. Add an Error message element to show your own styled messages, next to the field or for the whole form, instead.
Submit to a URL
Setting On submit to Submit to a URL is the escape hatch for endpoints Mosaic does not model. Instead of running actions, the form posts its fields straight to a web address you choose. Mosaic does not process or store the submission, and it does not know what the destination does with the data. This mode has these settings:
- Action URL: the web address the form submits to.
- Target: where the destination opens, such as the same tab (Self) or a new tab (Blank).
- Method: how the data is sent, Get or Post.
- Encoding: how the form data is encoded for the destination. Set this to whatever your target endpoint expects.
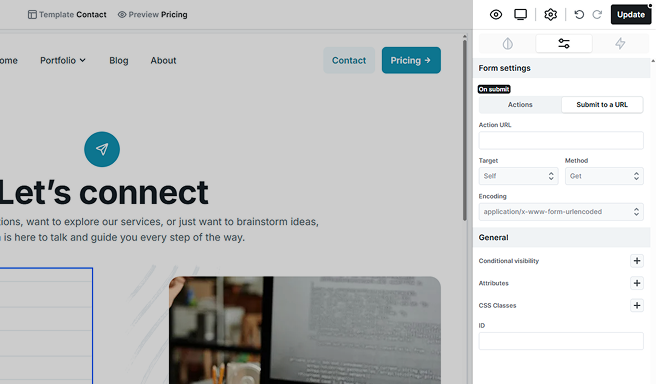
Because the submission goes to a destination outside Mosaic, this path does not run Mosaic’s server-side validation, and the honeypot and CAPTCHA spam protection do not apply to it. The browser-side checks, such as required fields and field formats, still run before the form is sent. Use Submit to a URL only for simple handoffs to an endpoint you trust; for anything that needs validation, spam protection, saved submissions, or actions like email, use Actions instead.
What your form can do on submit
When a submission succeeds, your form runs one or more actions — this is where you connect it to the rest of your workflow. You can add as many actions to a single form as you need.
- Email: send a notification to your inbox, or a confirmation to the person who submitted.
- Mailchimp: add the submitter to a Mailchimp audience, with field mapping and opt-in.
- MailerLite: add the submitter to a MailerLite group, with field mapping and opt-in.
- Webhook: send the submission to any external tool or automation platform, such as Zapier or Make.
- Redirect: send the visitor to another page after they submit.
- Search: turn the form into a site search.
See the full Actions documentation for setup details, dynamic variables, conditional actions, and retrying failed submissions.
Spam protection
Every form handled with Actions is protected by a built-in honeypot that quietly filters out automated spam, with nothing for you to set up. For stronger protection you can add a Cloudflare Turnstile or Google reCAPTCHA element to the form. See Spam protection.
Animating on submit
Mosaic’s interaction system includes a Form submit trigger that plays an interaction when a submission succeeds. Use it to run a tracking or analytics snippet on a successful sign-up, or to animate the form as it clears. See Interactions for how to set up a trigger.
Explore the form documentation
Each part of the form system has its own page. Start here to find the one you need.
Designing the form
- Fields & field groups: the wrappers (Field, Choice field, Field set) that hold your inputs and keep them labeled and organized.
- Text inputs: single-line inputs (text, email, phone, URL, number, date) and multi-line text areas.
- Select: a dropdown of options.
- Radio & checkbox: choice groups where visitors pick one option or several.
- File upload: let visitors attach files.
- Hidden input: submit a value the visitor never sees.
- Default values: prefill an input from a fixed value, the page address, and more.
- Submit button: the button that sends the form, with an optional loading state.
- Error message: show styled validation and error messages in place of the browser’s default.
- Success screen: the confirmation area shown after a successful submission.
Handling the submission
- Actions: what the form does on submit, including the Email, Mailchimp, MailerLite, Webhook, Redirect, and Search actions and running an action only when a condition matches.
- Spam protection: the built-in honeypot and the optional Cloudflare Turnstile and Google reCAPTCHA elements.
- Form submissions: review what your forms collect, retry a failed action, and manage stored submissions.